Flutter学习记录——11.流式布局组件
文章目录
- 1.Flow Widget
- 2.Wrap Widget
- 3.总结
1.Flow Widget
流式布局可以用在商品标签列表、不规则瀑布流列表、网格布局的使用上。简单地说流式布局就是可以自动换行的布局,如我们一行里的控件放不下了,则自动绘制到下一行。
Flutter 的 Flow 就可以自己自定义规则来控制子布局排列。Flow 继承自MultiChildRenderObjectWidget,Flow 性能比较好,绘制也比较灵活,可以定制布局效果。
Flow 的构造方法如下:
Flow({Key key,// 子布局排列配置规则@required this.delegate,// 布局子控件List<Widget> children = const <Widget>[],})
Flow 的构造方法很简单,最重要的就是 delegate 这个规则,我们按照需要编写即可。使用的时候,我们需要创建一个 Delegate 继承自 FlowDelegate。
我们接下来看一个完整的例子:
class FlowSamplesState extends State<FlowSamples> {@overridevoid initState() {super.initState();}@overrideWidget build(BuildContext context) {return Scaffold(appBar: AppBar(title: Text('Flow Demo'), primary: true),body: Flow(// 子控件排列绘制规则delegate: FlowWidgetDelegate(margin: EdgeInsets.all(10.0)),children: <Widget>[Container(width: 80.0,height: 80.0,color: Colors.orange,),Container(width: 160.0,height: 80.0,color: Colors.teal,),Container(width: 80.0,height: 80.0,color: Colors.red,),Container(width: 80.0,height: 80.0,color: Colors.yellow,),Container(width: 80.0,height: 80.0,color: Colors.brown,),Container(width: 80.0,height: 80.0,color: Colors.purple,),],));}}class FlowWidgetDelegate extends FlowDelegate {EdgeInsets margin = EdgeInsets.all(10);// 构造方法,传入每个child的间隔FlowWidgetDelegate({ this.margin});// 必须要重写的方法:child的绘制控制代码,可以调整尺寸位置@overridevoid paintChildren(FlowPaintingContext context) {var screenWidth = context.size.width;double offsetX = margin.left; //记录横向绘制的x坐标double offsetY = margin.top; //记录纵向绘制的y坐标// 遍历子控件进行绘制for (int i = 0; i < context.childCount; i++) {// 如果当前x左边加上子控件宽度小于屏幕宽度则继续绘制,否则换行var width = context.getChildSize(i).width + offsetX + margin.right;if (width < screenWidth) {// 绘制子控件context.paintChild(i,transform: Matrix4.translationValues(offsetX, offsetY, 0.0));offsetX = width + margin.left;} else {offsetX = margin.left;offsetY += context.getChildSize(i).height + margin.top + margin.bottom;//绘制子控件context.paintChild(i,transform: Matrix4.translationValues(offsetX, offsetY, 0.0));offsetX += context.getChildSize(i).width + margin.left + margin.right;}}}// 必须要重写的方法:是否需要重绘@overridebool shouldRepaint(FlowDelegate oldDelegate) {return oldDelegate != this;}// 可选重写方法:是否需要重新布局@overridebool shouldRelayout(FlowDelegate oldDelegate) {return super.shouldRelayout(oldDelegate);}// 可选重写方法:设置Flow布局的尺寸@overrideSize getSize(BoxConstraints constraints) {return super.getSize(constraints);}// 可选重写方法:设置每个child的布局约束条件,会覆盖已有的@overrideBoxConstraints getConstraintsForChild(int i, BoxConstraints constraints) {return super.getConstraintsForChild(i, constraints);}}
我们看下 Flow 布局的效果图:
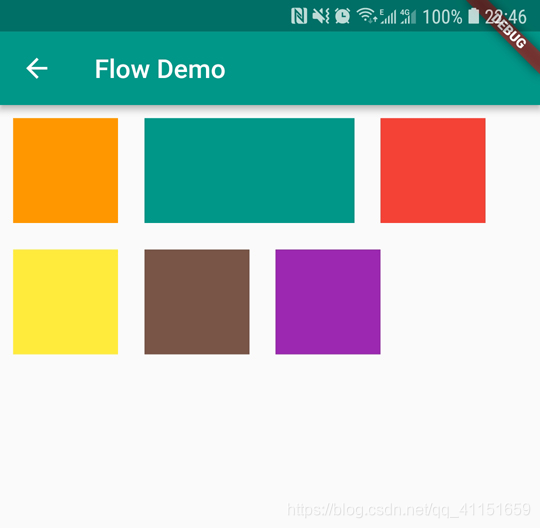
我们使用 Flow 的重点就是继承重写一个 FlowDelegate,FlowDelegate 里面最重要的方法就是paintChildren 方法,来定制我们的排列绘制子控件规则。
当然我们也可以实现更复杂一点的效果,可以根据自己的需求进行排列子控件,来实现流式布局或瀑布流布局效果。
2.Wrap Widget
Wrap 从字面意思上也很好理解,就是组件的大小是根据自身的实际大小来包裹的。在 Flutter 中Wrap 组件是一个可以使子控件自动换行的布局组件,默认的内部子控件排列方向是水平的。也就是超过指定宽度大小,就自动换到下一行。例如我们平时看到的商品标签页,标签是自动按行排列的。
其实 Wrap 可以实现的效果,Flow 也可以实现。我们可以根据方便程度进行合理选择。
Wrap 也是继承自 MultiChildRenderObjectWidget,内部可以放置多个子控件。
我们看下 Wrap 的构造方法:
Wrap({Key key,// 子控件在主轴上的排列方向this.direction = Axis.horizontal,// 子控件在主轴方向上的对齐方式this.alignment = WrapAlignment.start,// 主轴方向上子控件的间距this.spacing = 0.0,// 子控件在纵轴方向上的对齐方式this.runAlignment = WrapAlignment.start,// 子控件在纵轴方向上的间距this.runSpacing = 0.0,// 交叉轴上子控件的对齐方式this.crossAxisAlignment = WrapCrossAlignment.start,// 文本方向this.textDirection,// direction为Vertical时子控件排序顺序this.verticalDirection = VerticalDirection.down,// 子控件集合List<Widget> children = const <Widget>[],})
属性虽然多,但是很好理解,因为Wrap 很多属性和 Row、Column、Flex 这些组件的属性有所重复。
接下来通过一个代码实例,来看下 Wrap 的特点和用法:
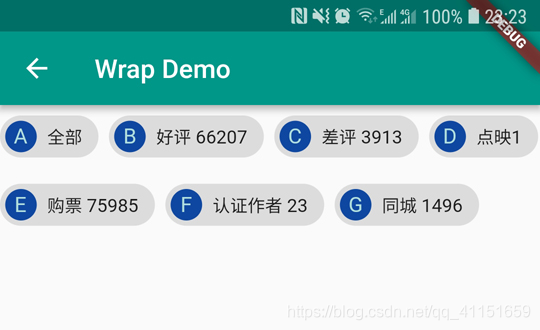
class WrapSamplesState extends State<WrapSamples> {@overridevoid initState() {super.initState();}@overrideWidget build(BuildContext context) {return Scaffold(appBar: AppBar(title: Text('Wrap Demo'), primary: true),// Wrap包裹的子控件会自动换行排列body: Wrap(spacing: 8.0, // 子控件横向间距runSpacing: 4.0, // 子控件纵向(每行)的间距// 子控件元素集合children: <Widget>[Chip(avatar: CircleAvatar(backgroundColor: Colors.blue.shade900, child: Text('A')),label: Text('全部'),),Chip(avatar: CircleAvatar(backgroundColor: Colors.blue.shade900, child: Text('B')),label: Text('好评 66207'),),Chip(avatar: CircleAvatar(backgroundColor: Colors.blue.shade900, child: Text('C')),label: Text('差评 3913'),),Chip(avatar: CircleAvatar(backgroundColor: Colors.blue.shade900, child: Text('D')),label: Text('点映1'),),Chip(avatar: CircleAvatar(backgroundColor: Colors.blue.shade900, child: Text('E')),label: Text('购票 75985'),),Chip(avatar: CircleAvatar(backgroundColor: Colors.blue.shade900, child: Text('F')),label: Text('认证作者 23'),),Chip(avatar: CircleAvatar(backgroundColor: Colors.blue.shade900, child: Text('G')),label: Text('同城 1496'),),],));}}
我们看下实例中 Wrap 布局实现的效果图:
怎么样,是不是很简单?当我们流式布局效果不是非常复杂的情况下,Wrap 用起来要简单些,如果Wrap实现不了,那么就可以用 Flow 来尝试实现流式布局或瀑布式布局的效果。
3.总结
本节课主要是给大家讲解了 Flutter 的几个常用的流式布局组件 Widget 的用法和特点。Wrap 用法简单些,Flow 用法复杂些,Flow 可以实现更复杂定制化流式或瀑布式布局效果。


自己笔记")


还没有评论,来说两句吧...