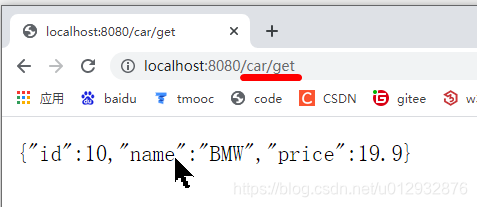
cgb2104-day13 àì夳堔傛蜴生んèń 2021-09-11 02:20 289阅读 0赞 ### 文章目录 ### * * 一,创建day13的module * 二,复习SpringMVC * * \--1,需求:访问/car/get ,获取汽车数据 * \--2,创建RunApp类 * \--3,创建Car类 * \--4,创建CarController类 * \--5,测试 * 三,SpringMVC解析请求参数 * * \--1,普通的GET提交 * \--2,RestFul提交 * 四,简单的前后端关联 * * \--1,需求 * \--2,创建html页面 * \--3,创建UserController类,解析参数 * 五,利用JDBC技术,把请求参数入库 * * \--1,添加jdbc的依赖(修改pom.xml) * \--2,准备user表 * \--3,修改UserController类的save() * \--4,测试 ## 一,创建day13的module ## 选中project-右键-new-module-选择maven-next-输入module名-finish ## 二,复习SpringMVC ## ### –1,需求:访问/car/get ,获取汽车数据 ### ![在这里插入图片描述][watermark_type_ZmFuZ3poZW5naGVpdGk_shadow_10_text_aHR0cHM6Ly9ibG9nLmNzZG4ubmV0L3UwMTI5MzI4NzY_size_16_color_FFFFFF_t_70] ### –2,创建RunApp类 ### package cn.tedu; import org.springframework.boot.SpringApplication; import org.springframework.boot.autoconfigure.SpringBootApplication; //启动类 @SpringBootApplication public class RunApp { public static void main(String[] args) { SpringApplication.run(RunApp.class); } } ### –3,创建Car类 ### package cn.tedu.pojo; //Model用来封装数据 public class Car { private int id; private String name; private double price; //Constructor构造方法,用来方便的new public Car(){ } public Car(int id, String name, double price) { this.id = id; this.name = name; this.price = price; } public int getId() { return id; } public void setId(int id) { this.id = id; } public String getName() { return name; } public void setName(String name) { this.name = name; } public double getPrice() { return price; } public void setPrice(double price) { this.price = price; } } ### –4,创建CarController类 ### package cn.tedu.controller; //MVC里的C层,用来接受请求和做出响应(springmvc) import cn.tedu.pojo.Car; import org.springframework.web.bind.annotation.RequestMapping; import org.springframework.web.bind.annotation.RestController; @RestController//接受请求,并把json数据返回 @RequestMapping("car") //规定了url地址的写法 public class CarController { @RequestMapping("get") public Car get(){ Car c = new Car(10,"BMW",19.9); return c ; } } ### –5,测试 ###  ## 三,SpringMVC解析请求参数 ## SpringMVC框架,可以自动解析请求中,携带的参数。甚至可以直接封装成Java对象。而不必自己一个个解析参数。 ### –1,普通的GET提交 ### package cn.tedu.controller; //MVC里的C层,用来接受请求和做出响应(springmvc) import cn.tedu.pojo.Car; import org.springframework.web.bind.annotation.RequestMapping; import org.springframework.web.bind.annotation.RestController; @RestController//接受请求,并把json数据返回 @RequestMapping("car") //规定了url地址的写法 public class CarController { //SpringMVC框架解析请求中的参数 //http://localhost:8080/car/get5?id=10&name=BMW&price=9.9 @RequestMapping("get5") public void get5(Car c){ //springmvc框架会把请求的参数,封装给car对象 System.out.println(c.getId()+c.getName()+c.getPrice()); } //http://localhost:8080/car/get4?id=10&name=BMW @RequestMapping("get4") public void get4(Integer id,String name){ //id是用来接受url里id的值,name用来接受url里name的值 System.out.println(id+name); } //http://localhost:8080/car/get3?id=10 @RequestMapping("get3") // public void get3(int id){ //参数是基本类型,访问这个方法必须带参数,否则有异常 public void get3(Integer id){ //参数是引用类型,访问这个方法没带参数就是null System.out.println(id); } //自己解析请求中的参数 public void get2(){ String url="http://localhost:8080/car/get2?id=10&name=BMW&price=9.9"; //先按?切出来,取第二部分,再用&切出来参数名和参数值[id=10,name=BMW,price=9.9] String[] s = url.split("\\?")[1].split("&"); for (String ss : s) { String key = ss.split("=")[0]; String value = ss.split("=")[1] ; } } @RequestMapping("get") public Car get(){ Car c = new Car(10,"BMW",19.9); return c ; } } ### –2,RestFul提交 ### package cn.tedu.controller; import org.springframework.web.bind.annotation.PathVariable; import org.springframework.web.bind.annotation.RequestMapping; import org.springframework.web.bind.annotation.RestController; //对比,请求参数的不同获取方式:get/restful @RestController @RequestMapping("car2") public class CarController2 { //1.普通的get方式获取请求参数 //解析参数:http://localhost:8080/car2/get?id=10&name=BMW&age=10&sex=1 @RequestMapping("get") public String get(Integer id,String name,Integer age,Integer sex){ // return id+name+age+sex ;//直接把结果展示在浏览器上 return "{'id':'"+id+"'}" ;//组织成json串给浏览器展示 } //2.restful方式获取请求参数:通过{}绑定地址中参数的位置 + 通过注解获取{???}的值 //解析参数:http://localhost:8080/car2/get2/10/BMW/10/1 @RequestMapping("get2/{id}/{name}/{x}/{y}") public void get2(@PathVariable Integer id, @PathVariable String name, @PathVariable String x, @PathVariable Integer y){ System.out.println(id); System.out.println(name); System.out.println(x); System.out.println(y); } } ## 四,简单的前后端关联 ## ### –1,需求 ### 点击页面的a,Get方式提交数据,交给框架解析参数 ### –2,创建html页面 ### <!DOCTYPE html> <html> <head> <meta charset="utf-8"> <title>用get方式提交数据给服务器</title> </head> <body> <a href="http://localhost:8080/user/save?id=857&name=jack&age=666">点我提交数据get</a> <a href="http://localhost:8080/user/save2/857/jack/666">点我提交数据restful</a> </body> </html> ### –3,创建UserController类,解析参数 ### package cn.tedu.controller; import org.springframework.web.bind.annotation.PathVariable; import org.springframework.web.bind.annotation.RequestMapping; import org.springframework.web.bind.annotation.RestController; @RestController @RequestMapping("user") public class UserController { //1. 解析get的请求参数 http://localhost:8080/user/save?id=857&name=jack&age=666 @RequestMapping("save") public void save(Integer id,String name,Integer age){ System.out.println(id+name+age); } //2. 解析restful的请求参数 http://localhost:8080/user/save2/857/jack/666 //get和restful的区别? //get的好处是数据都在地址栏拼接,restful的好处是相对安全 //restful主要是用来优化、简化get提交数据的写法 @RequestMapping("save2/{x}/{y}/{z}") public void save2(@PathVariable Integer x, @PathVariable String y, @PathVariable Integer z){ System.out.println(x+y+z); } } ## 五,利用JDBC技术,把请求参数入库 ## ![在这里插入图片描述][watermark_type_ZmFuZ3poZW5naGVpdGk_shadow_10_text_aHR0cHM6Ly9ibG9nLmNzZG4ubmV0L3UwMTI5MzI4NzY_size_16_color_FFFFFF_t_70 1] ### –1,添加jdbc的依赖(修改pom.xml) ### <?xml version="1.0" encoding="UTF-8"?> <project xmlns="http://maven.apache.org/POM/4.0.0" xmlns:xsi="http://www.w3.org/2001/XMLSchema-instance" xsi:schemaLocation="http://maven.apache.org/POM/4.0.0 http://maven.apache.org/xsd/maven-4.0.0.xsd"> <parent> <artifactId>cgb2104boot01</artifactId> <groupId>cn.tedu</groupId> <version>0.0.1-SNAPSHOT</version> </parent> <modelVersion>4.0.0</modelVersion> <artifactId>day13</artifactId> <!--添加jar包的依赖--> <dependencies> <dependency> <groupId>mysql</groupId> <artifactId>mysql-connector-java</artifactId> <version>5.1.48</version> </dependency> </dependencies> </project> ### –2,准备user表 ### CREATE TABLE `user` ( `id` int(3) default NULL, `name` varchar(10) default NULL, `age` int(2) default NULL ) ENGINE=InnoDB DEFAULT CHARSET=utf8; ### –3,修改UserController类的save() ### package cn.tedu.controller; import org.springframework.web.bind.annotation.PathVariable; import org.springframework.web.bind.annotation.RequestMapping; import org.springframework.web.bind.annotation.RestController; import java.sql.Connection; import java.sql.DriverManager; import java.sql.PreparedStatement; @RestController @RequestMapping("user") public class UserController { //1. 解析get的请求参数 http://localhost:8080/user/save?id=857&name=jack&age=666 @RequestMapping("save") public void save(Integer id,String name,Integer age) throws Exception { // System.out.println(id+name+age); /* 把解析出来的参数,利用jdbc技术入库*/ //注册驱动 Class.forName("com.mysql.jdbc.Driver"); //获取连接 String url ="jdbc:mysql:///cgb2104?characterEncoding=utf8&serverTimezone=Asia/Shanghai"; Connection conn = DriverManager.getConnection(url,"root","root"); //获取传输器 // String sql= "insert into user(id,name) values(?,?)";//给指定的字段设置值 String sql= "insert into user values(?,?,?)";//所有字段设置值 PreparedStatement ps = conn.prepareStatement(sql); //给SQL设置参数 ps.setInt(1,id);//给第一个?设置值 ps.setString(2,name);//给第二个?设置值 ps.setInt(3,age);//给第三个?设置值 //执行SQL int rows = ps.executeUpdate(); //释放资源 -- OOM(OutOfMemory) ps.close(); conn.close(); } //2. 解析restful的请求参数 http://localhost:8080/user/save2/857/jack/666 //get和restful的区别? //get的好处是数据都在地址栏拼接,restful的好处是相对安全 //restful主要是用来优化、简化get提交数据的写法 @RequestMapping("save2/{x}/{y}/{z}") public void save2(@PathVariable Integer x, @PathVariable String y, @PathVariable Integer z){ System.out.println(x+y+z); } } ### –4,测试 ### ![在这里插入图片描述][2021061517234278.png] ![在这里插入图片描述][watermark_type_ZmFuZ3poZW5naGVpdGk_shadow_10_text_aHR0cHM6Ly9ibG9nLmNzZG4ubmV0L3UwMTI5MzI4NzY_size_16_color_FFFFFF_t_70 2] [watermark_type_ZmFuZ3poZW5naGVpdGk_shadow_10_text_aHR0cHM6Ly9ibG9nLmNzZG4ubmV0L3UwMTI5MzI4NzY_size_16_color_FFFFFF_t_70]: /images/20210911/20dcd8283b3f4f9eada70b90fb2193d6.png [watermark_type_ZmFuZ3poZW5naGVpdGk_shadow_10_text_aHR0cHM6Ly9ibG9nLmNzZG4ubmV0L3UwMTI5MzI4NzY_size_16_color_FFFFFF_t_70 1]: /images/20210911/6e2339b9492743359912af374c3151cf.png [2021061517234278.png]: /images/20210911/de88fc1f1cdf49a39f9272baf5a08bd4.png [watermark_type_ZmFuZ3poZW5naGVpdGk_shadow_10_text_aHR0cHM6Ly9ibG9nLmNzZG4ubmV0L3UwMTI5MzI4NzY_size_16_color_FFFFFF_t_70 2]: /images/20210911/2a33181e6fe741fca58014a69954cd07.png
相关 cgb2106-day13 文章目录 一,SpringMVC \--1,概述 \--2,原理 \--3,创建Module 拼搏现实的明天。/ 2021年09月11日 03:24/ 0 赞/ 320 阅读
相关 cgb2104-day18 文章目录 一,Mybatis接口开发的练习 \--1,需求:查询car表里的所有数据 \--2,开发步骤: 客官°小女子只卖身不卖艺/ 2021年09月11日 02:26/ 0 赞/ 282 阅读
相关 cgb2104-day17 文章目录 一, MVC项目练习 \--1,需求 \--2,项目架构图 \--3,修改资源文件 快来打我*/ 2021年09月11日 02:26/ 0 赞/ 263 阅读
相关 cgb2104-day16 目录 一,MVC项目 --1,项目结构图 \--2,写前端网页(在HBuilder里) \--3,写RunApp \--4,写Car类 \--5,创建CarSe Bertha 。/ 2021年09月11日 02:24/ 0 赞/ 339 阅读
相关 cgb2104-day15 文章目录 一,改造springmvc的post提交数据 \--1,需求 \--2,添加jdbc的jar包依赖 Dear 丶/ 2021年09月11日 02:24/ 0 赞/ 277 阅读
相关 cgb2104-day14 文章目录 一,SpringMVC解析POST提交的数据 \--1,需求:解析form表单提交的大量数据 \--2, 桃扇骨/ 2021年09月11日 02:22/ 0 赞/ 322 阅读
相关 cgb2104-day13 文章目录 一,创建day13的module 二,复习SpringMVC \--1,需求:访问/car/get ,获取汽车数据 àì夳堔傛蜴生んèń/ 2021年09月11日 02:20/ 0 赞/ 290 阅读
还没有评论,来说两句吧...