springboot+ajax+验证码
一.效果

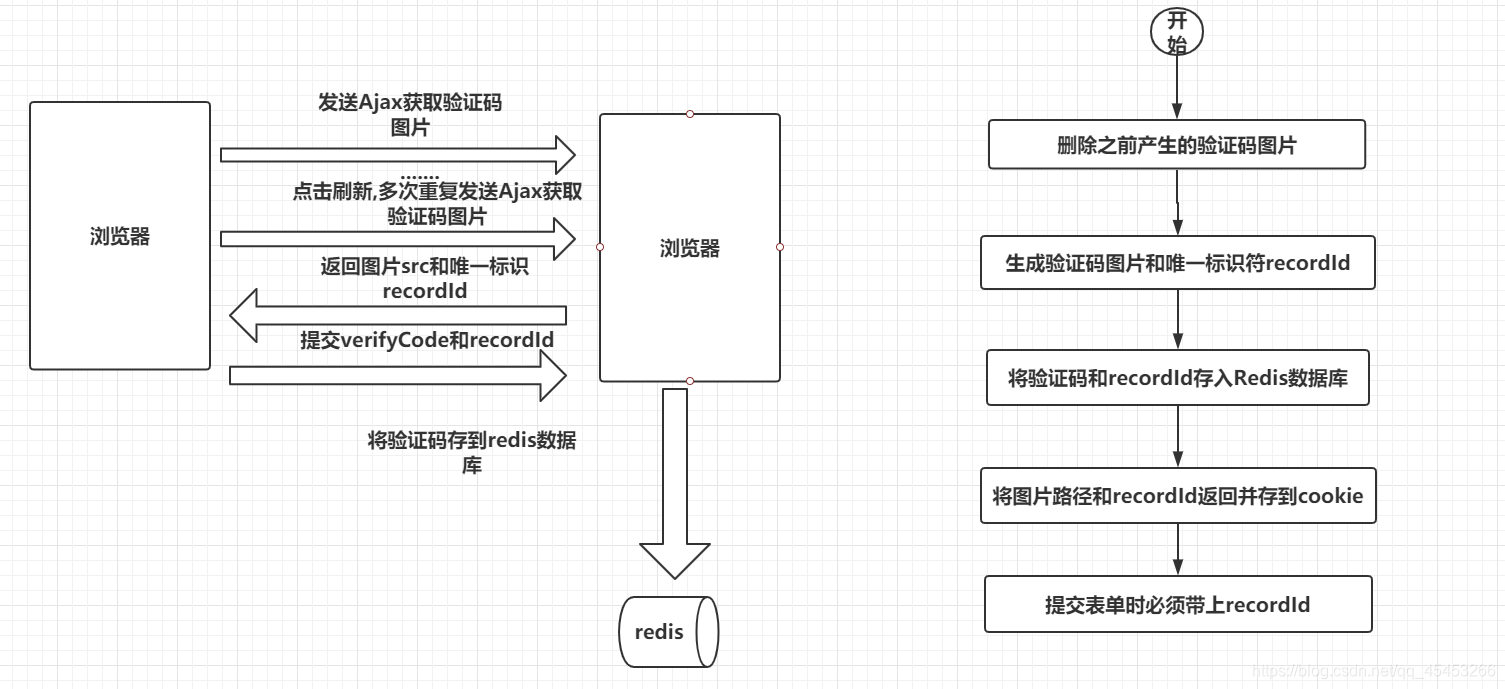
二.整体流程
三.详细代码
前端:
1.发起ajax请求获取验证码图片,拿到图片src后动态刷新.
function getVerifyCode() {$.ajax({url: URL + '/api/admin/code/',type: 'GET',data: {width: 180, //验证码图片的高height: 50, //验证码图片的宽},xhrFields: {withCredentials: true //前后端分离项目为解决跨域的问题必须这样设置},success: function (result) {var image = result.data.img;recordId = result.data.recordId;if (image != null && recordId != null) {$("#verify-code").attr("src", URL + image + ".png"); //动态刷新验证码图片$.cookie('recordId', recordId, { expires: 7, path: '/'}); //将验证码唯一标识recordId保存在cookie}}});}
2.点击刷新按钮,再次获取验证码图片
function paperEvent() {$("#refresh").click(function () {getVerifyCode();});}
后端:
1.生成验证码工具类:
package com.selenium.sdjubbs.common.util;import java.awt.Color;import java.awt.Font;import java.awt.Graphics2D;import java.awt.image.BufferedImage;import java.io.File;import java.io.IOException;import java.util.Random;import javax.imageio.ImageIO;/** * 随机生成验证码 * * @author selenium * */public class VerifyCodeUtil {public static String drawVerifyCode(int width, int height,String savePath,String imageName) throws IOException {StringBuffer verifyCode = new StringBuffer();Random random = new Random();BufferedImage bufferedImage = new BufferedImage(width, height, BufferedImage.TYPE_INT_RGB);Font font = new Font("微软雅黑", Font.BOLD, 40);int degree = random.nextInt() % 30; // 旋转角度小于30度int x = 10; // 旋转原点的 x 坐标int ROTATE_Y = 45;// 旋转原点的 y 坐标Graphics2D graphics = bufferedImage.createGraphics();graphics.setColor(Color.WHITE);// 设置画笔颜色,也是验证码的背景色graphics.fillRect(0, 0, width, height);graphics.setFont(font);// 绘制验证码for (int i = 0; i < 4; i++) {graphics.setColor(getRandomColor());// 正向旋转graphics.rotate(degree * Math.PI / 180, x, ROTATE_Y);String ch = getRandomChar();verifyCode.append(ch);graphics.drawString(ch, x, ROTATE_Y);// 反向旋转graphics.rotate(-degree * Math.PI / 180, x, ROTATE_Y);x += 48;}// 画干扰线for (int i = 0; i < 6; i++) {graphics.setColor(getRandomColor());graphics.drawLine(random.nextInt(width), random.nextInt(height), random.nextInt(width),random.nextInt(height));}// 添加噪点for (int i = 0; i < 30; i++) {graphics.setColor(getRandomColor());int x1 = random.nextInt(width);int y1 = random.nextInt(height);graphics.fillRect(x1, y1, 2, 2);}File dir =new File(savePath);if(!dir.exists()) {dir.mkdirs();}ImageIO.write(bufferedImage, "png",new File(savePath+File.separator+imageName+".png"));return verifyCode.toString();}/** * 随机取色 */private static Color getRandomColor() {Random random = new Random();Color color = new Color(random.nextInt(256), random.nextInt(256), random.nextInt(256));return color;}/** * 随机生成每个验证码 * * @return */private static String getRandomChar() {String baseString = "123456789abcdefghijklmnopqrstuvwxyzABCDEFGHJKLMNPQRSTUVWXYZ";Random random = new Random();String ch = baseString.charAt(random.nextInt(baseString.length())) + "";return ch;}}
2.验证码后端业务逻辑处理
@GetMapping(Api.VERIFY_CODE)public Result getVerifyCode(int width, int height, HttpServletRequest request) {//根据ip作为用户标识,进行md5加密后取前10位,加密是因为图片名会用到ip,不直接暴露路径String ip = MD5Util.md5(request.getRemoteAddr()).substring(0, 10);String imagePath = "/common/" + setting.getVerifyCodeSavePath().split("/common/")[1];//验证码的存储路径为 项目在系统中的绝对路径/相对于项目的存储路径/String savePath = System.getProperty("user.dir") + setting.getVerifyCodeSavePath();//验证码存储图片名:ip_时间戳String imageName = ip + "_" + System.currentTimeMillis();//1.如果此ip之前有产生验证码图片,先删除之前产生的验证码图片,防止用户不停点击刷新,不停创建验证码图片// 消耗内存.//2.每次产生的验证码图片名都应该不一样,不能直接覆盖,不然点击刷新后,后端图片发生了变化,但前端// 却还是显示的之前的验证码图片FileUtil.deleteFilesWithPrefix(savePath, ip);String verifyCode = "";String recordId = "";String verifyCodeKey = "";try {verifyCode = VerifyCodeUtil.drawVerifyCode(width, height, savePath, imageName);//验证码的唯一标识符recordIdrecordId = System.currentTimeMillis() + UUID.randomUUID().toString();//存入redis中的keyverifyCodeKey = "verifycode:" + ip + ":" + recordId;//60秒后验证码失效redisService.set(verifyCodeKey, verifyCode, 60);} catch (IOException e) {e.printStackTrace();}//将图片路径和唯一标识符recordId返回给前端return Result.success().add("img", imagePath + "/" + imageName).add("recordId", recordId);}
出现的一些问题:
1.Springboot项目中验证码图片生成后,直接访问不到图片.
图片存储的路径(C:\src\idea\SDJUBBS\src\main\resources\static\common\images\verifycode\xxx.png)
图片访问的路径(http://localhost:8080/common/images/verifycode/xxx.png)
原因是因为tomcat对于静态资源有保护的措施,需要我们通过程序,将访问路径映射到实际的路径
package com.selenium.sdjubbs.common.config;import org.springframework.beans.factory.annotation.Autowired;import org.springframework.context.annotation.Configuration;import org.springframework.web.servlet.config.annotation.ResourceHandlerRegistry;import org.springframework.web.servlet.config.annotation.WebMvcConfigurerAdapter;@Configurationpublic class ResourceConfig extends WebMvcConfigurerAdapter {@Autowiredprivate SdjubbsSetting setting;@Overridepublic void addResourceHandlers(ResourceHandlerRegistry registry) {//前面是映射后的地址,后面是需要映射的地址//获取文件的真实路径String path = System.getProperty("user.dir") + setting.getBaseDirSavePath();System.out.println(path);registry.addResourceHandler("/common/**").addResourceLocations("file:" + path);super.addResourceHandlers(registry);}}


拓扑排序")

")


还没有评论,来说两句吧...