Android消息机制之Looper、Handler、MessageQueen
前言
Android消息机制可以说是我们Android工程师面试题中的必考题,弄懂它的原理是我们避不开的任务,所以长痛不如短痛,花点时间干掉他,废话不多说,开车啦
Android消息机制的简介
在安卓开发中,常常会遇到获取数据后更新UI的问题,比如:在获取网络信息后,需要弹出一个Toast
HttpUtils.doGet("https://www.so.com/", new Callback() {@Overridepublic void onFailure(Call call, IOException e) {}@Overridepublic void onResponse(Call call, Response response) throws IOException {Toast.makeText(OkHttpActivity.this,"",Toast.LENGTH_SHORT).show();}});1234567891011
这个时候程序就会报以下的错误
java.lang.RuntimeException: Can't create handler inside thread that has not called Looper.prepare()1
这是因为Android规定了只允许UI线程修改Activity里的UI组件,而我们刚才的操作在子线程中修改Activity里的UI组件,才会导致UI操作的线程不安全,并报出错误。为了保证Android的UI操作是线程安全的,Android提供了Handler消息传递机制来解决这个问题
Android消息机制的使用
在获取网络信息后,需要弹出一个Toast,正确做法是
private static final int MAKE_TOAST = 0x01;private Handler mHandler = new Handler(){@Overridepublic void handleMessage(Message msg) {switch (msg.what){case MAKE_TOAST:Toast.makeText(OkHttpActivity.this,"",Toast.LENGTH_SHORT).show();break;}}};@Overrideprotected void onCreate(Bundle savedInstanceState) {super.onCreate(savedInstanceState);setContentView(R.layout.activity_gallery);HttpUtils.doGet("https://www.so.com/", new Callback() {@Overridepublic void onFailure(Call call, IOException e) {}@Overridepublic void onResponse(Call call, Response response) throws IOException {mHandler.sendEmptyMessageDelayed(MAKE_TOAST,200);}});}123456789101112131415161718192021222324252627282930
在子线程中通过Handler发送消息,该消息会在Hanlder中的handleMessage()中被解析,并进行相对应的UI组件更新
Android消息机制的相关概念
一、相关概念的解释
1、主线程(UI线程)
- 定义:当程序第一次启动时,Android会同时启动一条主线程(Main Thread)
- 作用:主线程主要负责处理与UI相关的事件
2、Message(消息)
- 定义:Handler接收和处理的消息对象(Bean对象)
- 作用:通信时相关信息的存放和传递
3、ThreadLocal
- 定义:线程内部的数据存储类
- 作用:负责存储和获取本线程的Looper
4、Message Queue(消息队列)
- 定义:采用单链表的数据结构来存储消息列表
- 作用:用来存放通过Handler发过来的Message,按照先进先出执行
5、Handler(处理者)
- 定义:Message的主要处理者
- 作用:负责发送Message到消息队列&处理Looper分派过来的Message
6、Looper(循环器)
- 定义:扮演Message Queue和Handler之间桥梁的角色
作用:
- 消息循环:循环取出Message Queue的Message
- 消息派发:将取出的Message交付给相应的Handler
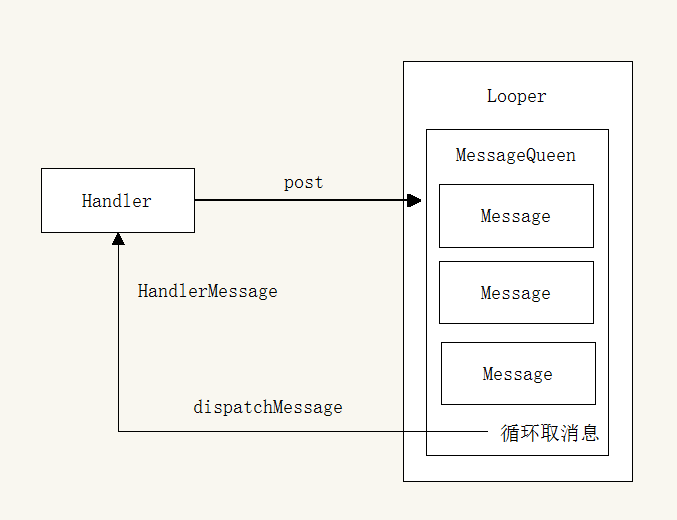
二、图片解读它们之间的关系
三、文字解读它们之间的关系
Looper中存放有MessageQueen,MessageQueen中又有很多Message,当我们的Handler发送消息的时候,会获取当前的Looper,并在当前的Looper的MessageQueen当中存放我们发送的消息,而我们的MessageQueen也会在Looper的带动下,一直循环的读取Message信息,并将Message信息发送给Handler,并执行HandlerMessage()方法
其实这是一个循环的过程,读懂这句话和看懂图解很重要,会给我们下面的源码分析带来很大的帮助,所以建议大家先读懂前面的内容
Android消息机制的通信流程
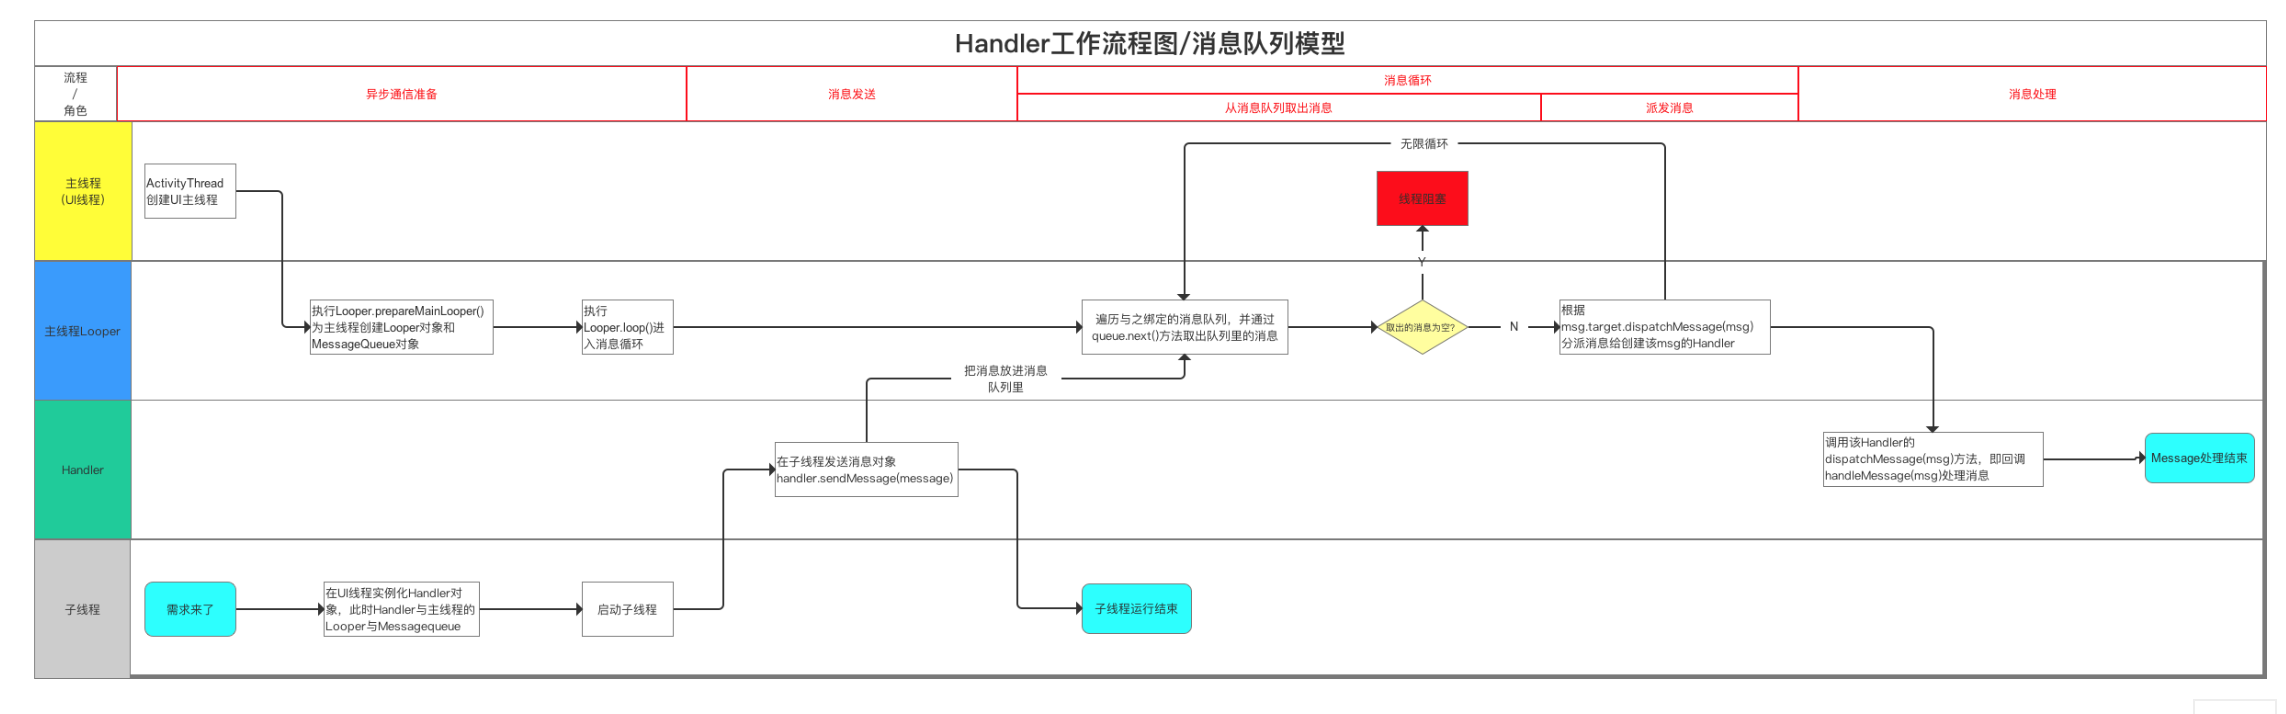
这里采用网上的一张图,个人感觉图片概括得很好,就没必要再去造同样的轮子了,在新窗口打开可浏览大图
Looper源码分析
一、根据上面的例子,为什么Handler可以在主线程中直接可以使用呢?
因为主线程(UI线程)的Looper在应用程序开启时创建好了,即在ActivityThread.main方法中创建的,该函数为Android应用程序的入口
public static void main(String[] args) {...Process.setArgV0("<pre-initialized>");//1. 创建消息循环LooperLooper.prepareMainLooper();ActivityThread thread = new ActivityThread();thread.attach(false);if (sMainThreadHandler == null) {sMainThreadHandler = thread.getHandler();}...//2. 执行消息循环Looper.loop();throw new RuntimeException("Main thread loop unexpectedly exited");}1234567891011121314151617
Looper中最为重要的两个方法:
- Looper.prepareMainLooper():该方法是Looper对象的初始化
- Looper.loop():该方法会循环取出Message Queue的Message,将取出的Message交付给相应的Handler(Looper的作用就体现在这里)
二、Looper.prepareMainLooper()
//在主线程中初始化Looperpublic static void prepareMainLooper() {//在这里会调用prepare(boolean quitAllowed)方法prepare(false);synchronized (Looper.class) {if (sMainLooper != null) {throw new IllegalStateException("The main Looper has already been prepared.");}sMainLooper = myLooper();}}//看下prepare(boolean quitAllowed)方法private static void prepare(boolean quitAllowed) {//判断sThreadLocal是否为null,否则抛出异常//即Looper.prepare()方法不能被调用两次//也就是说,一个线程中只能对应一个Looper实例if (sThreadLocal.get() != null) {throw new RuntimeException("Only one Looper may be created per thread");}//初始化Looper对象设置到ThreadLocal中sThreadLocal.set(new Looper(quitAllowed));}//看下Looper的构造方法private Looper(boolean quitAllowed) {//创建了一个MessageQueue(消息队列)//这说明,当创建一个Looper实例时,会自动创建一个与之配对的MessageQueue(消息队列)mQueue = new MessageQueue(quitAllowed);mThread = Thread.currentThread();}12345678910111213141516171819202122232425262728293031
整个Looper的初始化准备工作就完了,这里做了哪几件事:
- Looper的创建会关联一个MessageQueen的创建
- Looper对象只能被创建一次
- Looper对象创建后被存放在sThreadLocal中
三、Looper.loop()
public static void loop() {//myLooper()方法作用是返回sThreadLocal存储的Looper实例,如果me为null,loop()则抛出异常//也就是说loop方法的执行必须在prepare方法之后运行//也就是说,消息循环必须要先在线程当中创建Looper实例final Looper me = myLooper();if (me == null) {throw new RuntimeException("No Looper; Looper.prepare() wasn't called on this thread.");}//获取looper实例中的mQueue(消息队列)final MessageQueue queue = me.mQueue;Binder.clearCallingIdentity();final long ident = Binder.clearCallingIdentity();//进入消息循环for (;;) {//next()方法用于取出消息队列里的消息//如果取出的消息为空,则线程阻塞Message msg = queue.next();if (msg == null) {return;}final Printer logging = me.mLogging;if (logging != null) {logging.println(">>>>> Dispatching to " + msg.target + " " +msg.callback + ": " + msg.what);}final long traceTag = me.mTraceTag;if (traceTag != 0) {Trace.traceBegin(traceTag, msg.target.getTraceName(msg));}try {//消息派发:把消息派发给msg的target属性,然后用dispatchMessage方法去处理//Msg的target其实就是handler对象,下面会继续分析msg.target.dispatchMessage(msg);} finally {if (traceTag != 0) {Trace.traceEnd(traceTag);}}if (logging != null) {logging.println("<<<<< Finished to " + msg.target + " " + msg.callback);}final long newIdent = Binder.clearCallingIdentity();if (ident != newIdent) {Log.wtf(TAG, "Thread identity changed from 0x"+ Long.toHexString(ident) + " to 0x"+ Long.toHexString(newIdent) + " while dispatching to "+ msg.target.getClass().getName() + " "+ msg.callback + " what=" + msg.what);}//释放消息占据的资源msg.recycleUnchecked();}}1234567891011121314151617181920212223242526272829303132333435363738394041424344454647484950515253545556575859
整个Looper的循环过程就完了,这里做了哪几件事:
- 取出Looper和MessageQueen
- 进入消息循环,有消息则分发出去
- 消息资源的回收
四、Looper的退出
当然Looper也提供了两个方法可以退出一个Looper:
- quit():quit会直接退出Looper
- quitSafety():quitSafety只是设定一个退出标记,然后把消息队列中的已有消息处理完毕后退出Looper
MessageQueen源码分析
一、由于MessageQueen是用来存放Message的,那么是如何存储Message的呢?
由于Handler使用Post()方法将Message传递到MessageQueen中,在MessageQueen中会使用enqueueMessage()方法存储Message,其实现的方式是通过单链表的数据结构来存储消息列表
boolean enqueueMessage(Message msg, long when) {...synchronized (this) {...msg.markInUse();msg.when = when;Message p = mMessages;boolean needWake;if (p == null || when == 0 || when < p.when) {msg.next = p;mMessages = msg;needWake = mBlocked;} else {needWake = mBlocked && p.target == null && msg.isAsynchronous();Message prev;for (;;) {prev = p;p = p.next;if (p == null || when < p.when) {break;}if (needWake && p.isAsynchronous()) {needWake = false;}}msg.next = p;prev.next = msg;}if (needWake) {nativeWake(mPtr);}}return true;}1234567891011121314151617181920212223242526272829303132333435
整个进队列的过程就完了,这里做了哪几件事:
- 首先判断消息队列里有没有消息,没有的话则将当前插入的消息作为队头,并且这时消息队列如果处于等待状态的话则将其唤醒
- 若是在中间插入,则根据Message创建的时间进行插入
二、既然MessageQueen存了消息之后,是如何提供取出来的方法的呢?
我们知道存消息是Handler存进来的,那么取消息就应该是Looper中取了,从Looper的源码可以看出,消息就是在Looper中取出的,其实现是用MessageQueen里面的next()方法
Message next() {......int nextPollTimeoutMillis = 0;for (;;) {if (nextPollTimeoutMillis != 0) {Binder.flushPendingCommands();}// nativePollOnce方法在native层,若是nextPollTimeoutMillis为-1,这时候消息队列处于等待状态。nativePollOnce(ptr, nextPollTimeoutMillis);synchronized (this) {final long now = SystemClock.uptimeMillis();Message prevMsg = null;Message msg = mMessages;if (msg != null && msg.target == null) {do {prevMsg = msg;msg = msg.next;} while (msg != null && !msg.isAsynchronous());}//按照我们设置的时间取出消息if (msg != null) {if (now < msg.when) {nextPollTimeoutMillis = (int) Math.min(msg.when - now, Integer.MAX_VALUE);} else {mBlocked = false;if (prevMsg != null) {prevMsg.next = msg.next;} else {mMessages = msg.next;}msg.next = null;if (DEBUG) Log.v(TAG, "Returning message: " + msg);msg.markInUse();return msg;}} else {// 如果消息队列中没有消息,将nextPollTimeoutMillis设为-1,下次循环消息队列则处于等待状态nextPollTimeoutMillis = -1;}//退出消息队列,返回null,这时候Looper中的消息循环也会终止。if (mQuitting) {dispose();return null;}......}.....}}12345678910111213141516171819202122232425262728293031323334353637383940414243444546474849505152
三、在MessageQueen存消息的媒介当然是通过Message对象啦,那这个Message对象又是什么呢?
其实这个Message就是用来存储Message中各种信息的Bean对象,从源码中可以其属性,这里例举我们常用的几个
public int what;public int arg1;public int arg2;public Object obj;public Messenger replyTo;int flags;long when;Bundle data;Handler target;Runnable callback;12345678910
Handler源码分析
一、Handler的创建
Handler的创建会关联一个Looper对象,而Looper对象是关联着MessageQueen对象,所以在Handler创建时候,取出Looper和MessageQueen
public Handler(Callback callback, boolean async) {...//取出LoopermLooper = Looper.myLooper();if (mLooper == null) {throw new RuntimeException("Can't create handler inside thread that has not called Looper.prepare()");}//取出Looper中的MessageQueenmQueue = mLooper.mQueue;mCallback = callback;mAsynchronous = async;}12345678910111213
前面我们也说过了Looper是存放在ThreadLocal里面的,可以看到下面的源码就知道了
public static @Nullable Looper myLooper() {return sThreadLocal.get();}123
整个创建的过程就完了,这里做了哪几件事:
- 取出Looper
- 取出Looper中的MessageQueen
二、Handler发送消息
1、方式一:sendMessage(Message msg)
public final boolean sendEmptyMessage(int what){return sendEmptyMessageDelayed(what, 0);}//往下追踪public final boolean sendEmptyMessageDelayed(int what, long delayMillis) {Message msg = Message.obtain();msg.what = what;return sendMessageDelayed(msg, delayMillis);}//往下追踪public final boolean sendMessageDelayed(Message msg, long delayMillis){if (delayMillis < 0) {delayMillis = 0;}return sendMessageAtTime(msg, SystemClock.uptimeMillis() + delayMillis);}//往下追踪public boolean sendMessageAtTime(Message msg, long uptimeMillis) {//直接获取MessageQueueMessageQueue queue = mQueue;if (queue == null) {RuntimeException e = new RuntimeException(this + " sendMessageAtTime() called with no mQueue");Log.w("Looper", e.getMessage(), e);return false;}return enqueueMessage(queue, msg, uptimeMillis);}//调用sendMessage方法其实最后是调用了enqueueMessage方法private boolean enqueueMessage(MessageQueue queue, Message msg, long uptimeMillis) {//为msg.target赋值为this,也就是把当前的handler作为msg的target属性//如果大家还记得Looper的loop()方法会取出每个msg然后执行msg.target.dispatchMessage(msg)去处理消息,其实就是派发给相应的Handlermsg.target = this;if (mAsynchronous) {msg.setAsynchronous(true);}//最终调用queue的enqueueMessage的方法,也就是说handler发出的消息,最终会保存到消息队列中去return queue.enqueueMessage(msg, uptimeMillis);}123456789101112131415161718192021222324252627282930313233343536373839404142434445
2、方式二:post(Ruunable r)
public final boolean post(Runnable r){return sendMessageDelayed(getPostMessage(r), 0);}1234
其实post()方法最终也会保存到消息队列中去,和上面不同的是它传进来的一个Runnable对象,执行了getPostMessage()方法,我们往下追踪
private static Message getPostMessage(Runnable r) {Message m = Message.obtain();m.callback = r;return m;}12345
实质上就是将这个Runnable保存在Message的变量中,这就导致了我们下面处理消息的时候有两种不同方案
三、Handler处理消息
你还记得前面所说Looper中msg.target.dispatchMessage()方法吗?这个方法就是调用Handler的dispatchMessage()
public void dispatchMessage(Message msg) {if (msg.callback != null) {//1. post()方法的处理方法handleCallback(msg);} else {if (mCallback != null) {if (mCallback.handleMessage(msg)) {return;}}//2. sendMessage()方法的处理方法handleMessage(msg);}}//1. post()方法的最终处理方法private static void handleCallback(Message message) {message.callback.run();}//2. sendMessage()方法的最终处理方法public void handleMessage(Message msg) {}1234567891011121314151617181920212223
整个处理的过程就完了,这里做了哪几件事:
- post()方法的处理方法就是将传进来的Runnable执行run()方法
- sendMessage()方法的处理方法就是执行handleMessage()空方法,这也是我们为什么要在Handler重写这个方法的原因
面试题
一、请解释下Android通信机制中Message、Handler、MessageQueen、Looper的之间的关系?
首先,是这个MessageQueen,MessageQueen是一个消息队列,它可以存储Handler发送过来的消息,其内部提供了进队和出队的方法来管理这个消息队列,其出队和进队的原理是采用单链表的数据结构进行插入和删除的,即enqueueMessage()方法和next()方法。这里提到的Message,其实就是一个Bean对象,里面的属性用来记录Message的各种信息。
然后,是这个Looper,Looper是一个循环器,它可以循环的取出MessageQueen中的Message,其内部提供了Looper的初始化和循环出去Message的方法,即prepare()方法和loop()方法。在prepare()方法中,Looper会关联一个MessageQueen,而且将Looper存进一个ThreadLocal中,在loop()方法中,通过ThreadLocal取出Looper,使用MessageQueen的next()方法取出Message后,判断Message是否为空,如果是则Looper阻塞,如果不是,则通过dispatchMessage()方法分发该Message到Handler中,而Handler执行handlerMessage()方法,由于handlerMessage()方法是个空方法,这也是为什么需要在Handler中重写handlerMessage()方法的原因。这里要注意的是Looper只能在一个线程中只能存在一个。这里提到的ThreadLocal,其实就是一个对象,用来在不同线程中存放对应线程的Looper。
最后,是这个Handler,Handler是Looper和MessageQueen的桥梁,Handler内部提供了发送Message的一系列方法,最终会通过MessageQueen的enqueueMessage()方法将Message存进MessageQueen中。我们平时可以直接在主线程中使用Handler,那是因为在应用程序启动时,在入口的main方法中已经默认为我们创建好了Looper。
二、Handler能在子线程创建吗?
Handler是不可以直接在子线程创建的,由于Handler在子线程没有Looper,所以在子线程中会报错。但是可以通过间接的方式在子线程中创建Handler,有两种方式可以在子线程中创建Handler
方式一:在子线程创建Handler的时候使用主线程的Looper,这样handlerMessage的回调就在主线程运行
new Thread(new Runnable() {public void run() {// Looper.getMainLooper()获取主线程的LooperHandler handler = new Handler(Looper.getMainLooper()){@Overridepublic void handleMessage(Message msg) {// 在主线程中执行,可以做UI操作Toast.makeText(getApplicationContext(), "handler msg", Toast.LENGTH_LONG).show();}};handler.sendEmptyMessage(1);};}).start();12345678910111213
方式二:在子线程创建Handler的时候创建子线程的Looper,这样handlerMessage的回调就在子线程运行
new Thread(new Runnable() {public void run() {// 创建子线程LooperLooper.prepare();Handler handler = new Handler(){@Overridepublic void handleMessage(Message msg) {// 在子线程中执行,不可以做UI操作Toast.makeText(getApplicationContext(), "handler msg", Toast.LENGTH_LONG).show();}};// 开始循环LooperLooper.loop();};}).start();123456789101112131415
易错点:在子线程去创建对象,对象本身又实例化Handler,问题又会回到子线程创建Handler导致报错的问题
public class MainActivity extends AppCompatActivity {@Overrideprotected void onCreate(Bundle savedInstanceState) {super.onCreate(savedInstanceState);setContentView(R.layout.activity_main);new Thread(new Runnable() {@Overridepublic void run() {// 子线程实例化对象Stub stub = new Stub();stub.startAction();}}).start();}}public class Stub {// 在子线程中创建Handler,会报错public Handler mHanlder = new Handler(){@Overridepublic void handleMessage(Message msg) {super.handleMessage(msg);}};public void startAction(){}}1234567891011121314151617181920212223242526272829303132
结语
学习完了消息机制,回过头来看还是挺简单的。由于每个人都有惧怕困难的天性,一开始我也是看不懂,很怕看源码,但是我还是坚持了2天时间,借助书本知识和网上的知识,将这个消息机制给克服了。慢慢的,我们会将养成这种习惯,那么你离大神的脚步就不远了,加油吧


")

")
")


还没有评论,来说两句吧...