vue +security 前后段分离权限管理小demo
security+ vue 实现前后端分离权限
演示视频链接:
https://gulibuckets.oss-cn-shenzhen.aliyuncs.com/Action 2021-6-1 20-46-34.mp4?versionId=CAEQIxiBgICG8ceezhciIGYwOGFhNDRjYmJmZDQ3M2ZhNWNkODkxMWFjMmYwMjY3
gitee demo 地址 : https://gitee.com/wx\_c3b99916a9/vue\_security/tree/css/
第一步:跨域问题,
前后段分离,需要解决跨域 问题,像当前vue + security 解决:有以下会遇到的解决跨域的方法
第一: 使用 srping 注解 @CrossOrigin (只能解决本controller 控制器 , 或者 ,本方法跨域)
第二,全局跨域 需要写一个 过滤器 来继承 WebMvcConfigurer 接口,然后配合
@Configurationpublic class CorsConfig implements WebMvcConfigurer {private CorsConfiguration buildConfig() {CorsConfiguration corsConfiguration = new CorsConfiguration();corsConfiguration.addAllowedOrigin("*");corsConfiguration.addAllowedHeader("*");corsConfiguration.addAllowedMethod("*");corsConfiguration.addExposedHeader("Authorization");return corsConfiguration;}@Beanpublic CorsFilter corsFilter() {UrlBasedCorsConfigurationSource source = new UrlBasedCorsConfigurationSource();source.registerCorsConfiguration("/**", buildConfig());return new CorsFilter(source);}@Overridepublic void addCorsMappings(CorsRegistry registry) {registry.addMapping("/**").allowedOriginPatterns("*").allowCredentials(true).allowedMethods("GET", "POST", "DELETE", "PUT").maxAge(3600);}}
第三: security 内置解决跨域 配置
public class CsrfSecurityRequestMatcher implements RequestMatcher {private final Pattern allowedMethods = Pattern.compile("^(GET|HEAD|TRACE|OPTIONS)$");//设置可以放过的请求private final RegexRequestMatcher unprotectedMatcher = new RegexRequestMatcher("^/.*", null);@Overridepublic boolean matches(HttpServletRequest request) {if(allowedMethods.matcher(request.getMethod()).matches()){return false;}return !unprotectedMatcher.matches(request);}}http.cors();RequestMatcher requestMatcher = new CsrfSecurityRequestMatcher();http.csrf().requireCsrfProtectionMatcher(requestMatcher);/* 解决前端跨域的问题*/@BeanCorsConfigurationSource corsConfigurationSource() {CorsConfiguration configuration = new CorsConfiguration();configuration.addAllowedOriginPattern("*");//修改为添加而不是设置,* 最好改为实际的需要,我这是非生产配置,所以粗暴了一点configuration.addAllowedMethod("*");//修改为添加而不是设置configuration.addAllowedHeader("*");//这里很重要,起码需要允许 Access-Control-Allow-Originconfiguration.setAllowCredentials(true);UrlBasedCorsConfigurationSource source = new UrlBasedCorsConfigurationSource();source.registerCorsConfiguration("/**", configuration);return source;}
第四中:还有在 vue 中需要对 axios 进行配置拦截
后端代码编写:
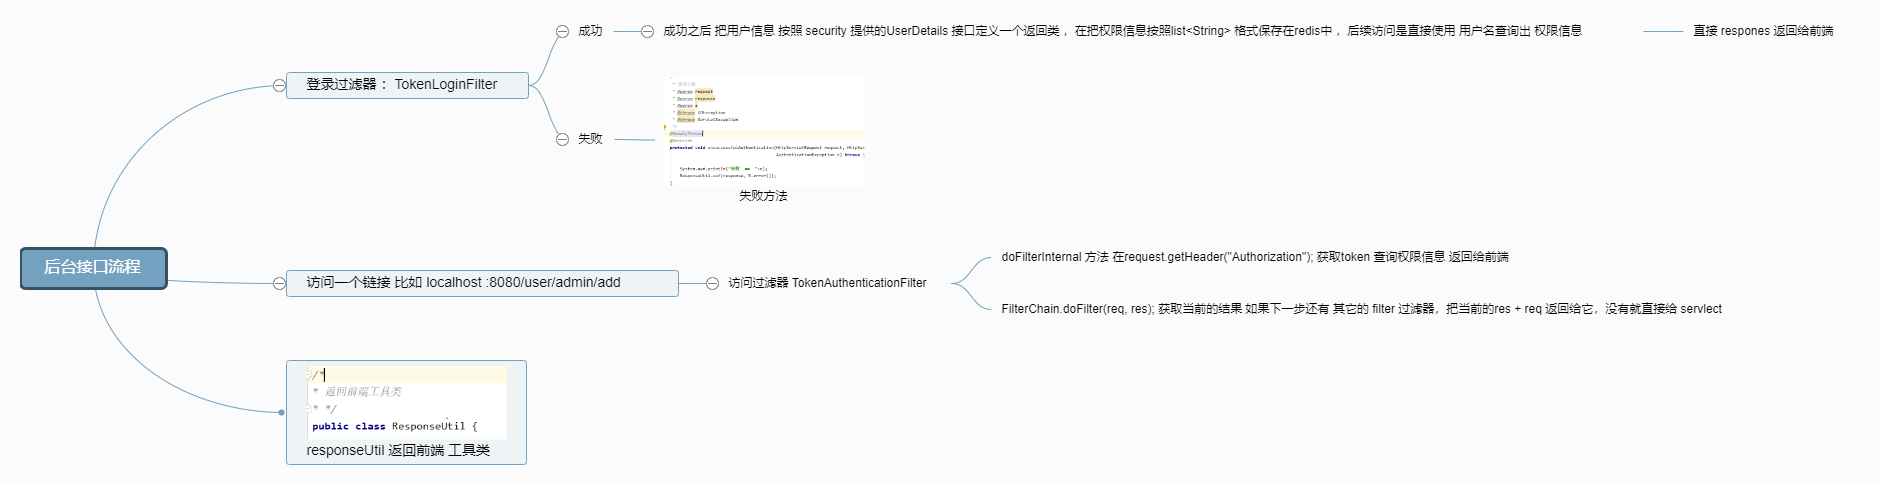
import com.ljm.filter.TokenAuthenticationFilter;import com.ljm.filter.TokenLoginFilter;import com.ljm.pojo.DefaultPasswordEncoder;import com.ljm.security.TokenLogoutHandler;import com.ljm.security.TokenManager;import com.ljm.security.UnauthorizedEntryPoint;import com.ljm.securitys.JwtAccessDeniedHandler;import com.ljm.service.impl.UserDetailsServiceImpl;import org.springframework.beans.factory.annotation.Autowired;import org.springframework.beans.factory.annotation.Qualifier;import org.springframework.context.annotation.Bean;import org.springframework.context.annotation.Configuration;import org.springframework.data.redis.core.RedisTemplate;import org.springframework.security.authentication.AuthenticationManager;import org.springframework.security.config.annotation.authentication.builders.AuthenticationManagerBuilder;import org.springframework.security.config.annotation.method.configuration.EnableGlobalMethodSecurity;import org.springframework.security.config.annotation.web.builders.HttpSecurity;import org.springframework.security.config.annotation.web.builders.WebSecurity;import org.springframework.security.config.annotation.web.configuration.EnableWebSecurity;import org.springframework.security.config.annotation.web.configuration.WebSecurityConfigurerAdapter;import org.springframework.security.core.userdetails.UserDetailsService;import org.springframework.security.web.util.matcher.RequestMatcher;import org.springframework.web.cors.CorsConfiguration;import org.springframework.web.cors.CorsConfigurationSource;import org.springframework.web.cors.UrlBasedCorsConfigurationSource;/** * <p> * Security配置类 * </p> * * @author qy * @since 2019-11-18 */@Configuration@EnableWebSecurity@EnableGlobalMethodSecurity(prePostEnabled = true)public class TokenWebSecurityConfig extends WebSecurityConfigurerAdapter {// 查询到用户 信息 + 权限 权限编码 user:user:list, user :user: add@Autowiredprivate UserDetailsServiceImpl userDetailsService;// token 返回 用户名 + 角色 + 密码 加密 jwt 字符串@Autowiredprivate TokenManager tokenManager;/// 自定义密码加密方式 MD5@Qualifier("DefaultPasswordEncoder")@Autowiredprivate DefaultPasswordEncoder defaultPasswordEncoder;// 定义返回的 redis 模板@Qualifier("redisTemplateAAA")@Autowiredprivate RedisTemplate redisTemplate;/// 认证入口@AutowiredUnauthorizedEntryPoint unauthorizedEntryPoint;@Autowiredpublic TokenWebSecurityConfig(UserDetailsServiceImpl userDetailsService, DefaultPasswordEncoder defaultPasswordEncoder,TokenManager tokenManager, RedisTemplate redisTemplate) {this.userDetailsService = userDetailsService;this.defaultPasswordEncoder = defaultPasswordEncoder;this.tokenManager = tokenManager;this.redisTemplate = redisTemplate;}/** * 配置设置 * @param http * @throws Exception */@Overrideprotected void configure(HttpSecurity http) throws Exception {http.exceptionHandling()// 认证入口.authenticationEntryPoint(unauthorizedEntryPoint)// .accessDeniedHandler(jwtAccessDeniedHandler).and().csrf().disable().authorizeRequests().anyRequest().authenticated()/// 登出自定义链接.and().logout().logoutUrl("/userEntity/logout")/// token 处理.addLogoutHandler(new TokenLogoutHandler(tokenManager,redisTemplate)).and()/// 登录 成功 处理.addFilter(new TokenLoginFilter(authenticationManager(), tokenManager, redisTemplate))/// 访问处理器.addFilter(new TokenAuthenticationFilter(authenticationManager(), tokenManager, redisTemplate));//自定义csrf防御// http.formLogin().loginPage("/admin/acl/login").usernameParameter("username").passwordParameter("password");http.cors();RequestMatcher requestMatcher = new CsrfSecurityRequestMatcher();http.csrf().requireCsrfProtectionMatcher(requestMatcher);}/** * 登录信息 查询权限 + 用户 * @param auth * @throws Exception */@Overridepublic void configure(AuthenticationManagerBuilder auth) throws Exception {auth.userDetailsService(userDetailsService).passwordEncoder(defaultPasswordEncoder);}/** * 配置哪些请求不拦截 * @param web * @throws Exception "/","/login", */@Overridepublic void configure(WebSecurity web) throws Exception {web.ignoring().antMatchers("/api/**","/swagger-resources/**", "/webjars/**", "/v2/**", "/swagger-ui.html/**");}/* 解决前端跨域的问题*/@BeanCorsConfigurationSource corsConfigurationSource() {CorsConfiguration configuration = new CorsConfiguration();configuration.addAllowedOriginPattern("*");//修改为添加而不是设置,* 最好改为实际的需要,我这是非生产配置,所以粗暴了一点configuration.addAllowedMethod("*");//修改为添加而不是设置configuration.addAllowedHeader("*");//这里很重要,起码需要允许 Access-Control-Allow-Originconfiguration.setAllowCredentials(true);UrlBasedCorsConfigurationSource source = new UrlBasedCorsConfigurationSource();source.registerCorsConfiguration("/**", configuration);return source;}}
前端vue
1.0版本:
概括:思路和代码流程都比较简单,在后台security 配置代码中对所有的方法都允许访问,
/** * 配置哪些请求不拦截 * @param web * @throws Exception "/","/login", */@Overridepublic void configure(WebSecurity web) throws Exception {web.ignoring().antMatchers("*","/api/**","/swagger-resources/**", "/webjars/**", "/v2/**", "/swagger-ui.html/**");}
前端中在加载页面是获取,后台在登录成功时放回给页面的heater (存放我们的token ),解析获取用户信息,查询角色操控权限,在vue 中的
mounted: function () { ///页面加载前执行的函数 tokenname()this.tokenname()},
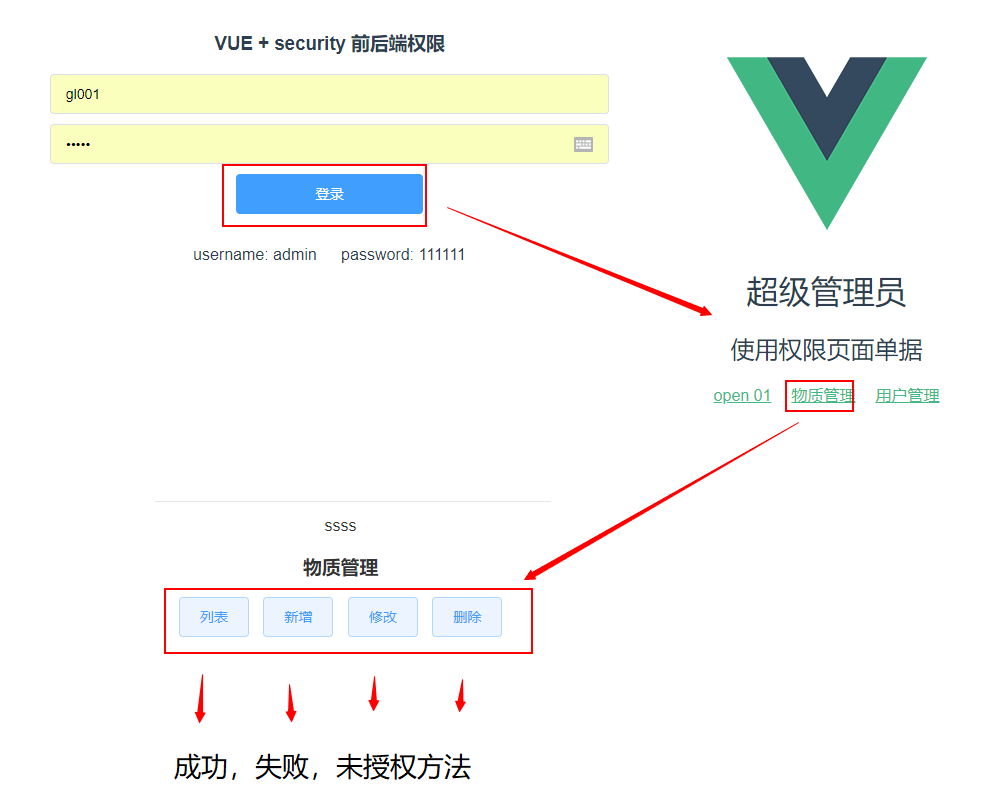
获取到一个list 操作集合,然后对每个集合v-for 循环 ,可以按钮就显示,不可以就不显示,这样就可以做一个简单的前后端分离权限控制
<template><div class="hello"><h1>{{ msg }}</h1><h2>使用权限页面单据</h2><ul><li v-for="router in routerlist"><router-link :to="router.path">{{router.piecename}}</router-link></li><!-- <li>--------------------------------------</li><li><a @click="button1()">用户权限管理 </a></li><li><a @click="button2()">物质管理 </a></li><li><a @click="button3()">open01 </a></li> --></ul></div></template><script>import Cookies from 'js-cookie'export default {name: 'HelloWorld',data () {return {msg: 'Welcome to Your Vue.js App',routerlist: [{ piecename: '模块01', path: '/user' },{ piecename: '模块02', path: '/matter' },{ piecename: '模块03', path: '/open1' }]}},mounted: function () {this.tokenname()},methods: {tokenname () {let accessToken = Cookies.get('accessToken')console.log(accessToken)/// 查询用户名称,可以不写this.$axios.post('/userEntity/info').then((res) => {console.log(res)this.msg = res.data.message})/// 查询用户权限this.$axios.post('/userEntity/menc').then((res) => {console.log(res.data.data.list)this.msg = res.data.data.list[0].user_namethis.routerlist = res.data.data.list})},button1 () {this.$router.push({ path: '/user' })},button2 () {this.$router.push({ path: '/matter' })},button3 () {this.$router.push({ path: '/open1' })}}}</script><!-- Add "scoped" attribute to limit CSS to this component only --><style scoped>h1,h2 {font-weight: normal;}ul {list-style-type: none;padding: 0;}li {color: #42b983;display: inline-block;margin: 0 10px;}a {cursor: default;color: #42b983;}</style>
1.0 版本:优点:思路简单,代码流程也不是很复杂,对于数据库中权限部分要求也不高,
缺点: 没有使用到security 框架的核心效果,在处理一下比较复杂的权限的时候,系统的安全性存在很大的漏洞!!
2.0版本:
登录成功修改为以下效果
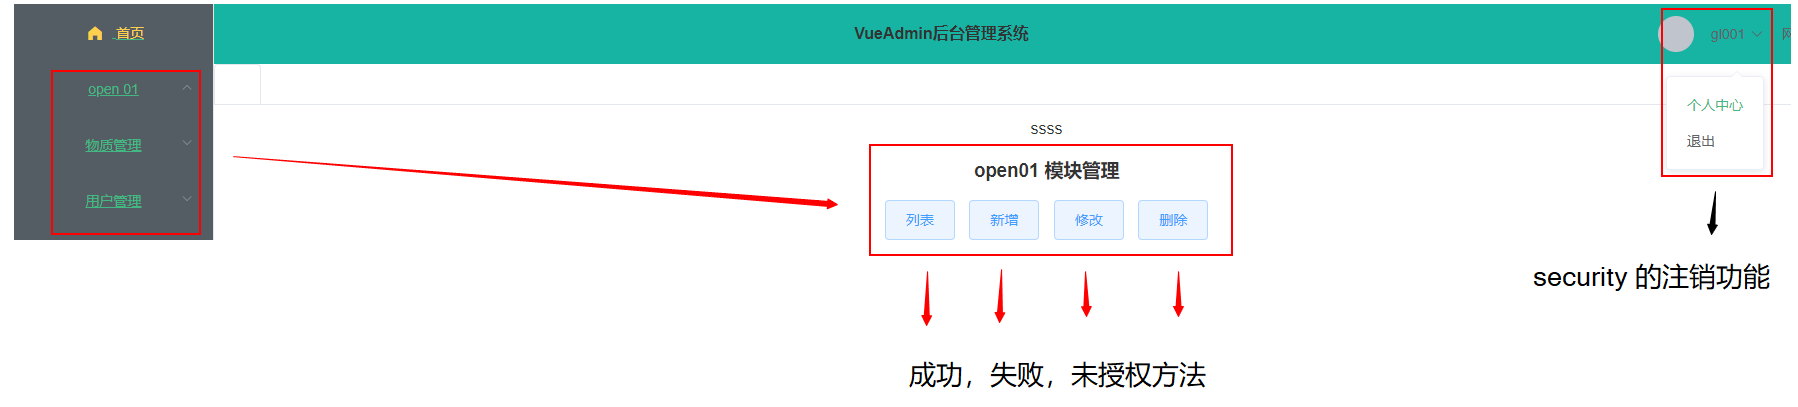
相对于1.0 版本,在登录成功之后,页面的跳转使用的是vue 中路由器router, 点击路由跳转到时候,路径跳转完成,页面内容嵌套在主页中,不用每次跳转获取到用户信息查询权限,功能也更加的全面,后台中出一些前后端分离使用的必要测试接口,其它方法全部拦截,在security 配置中,添加了 几个过滤器处理不同的前台登录情况,方法调用情况,
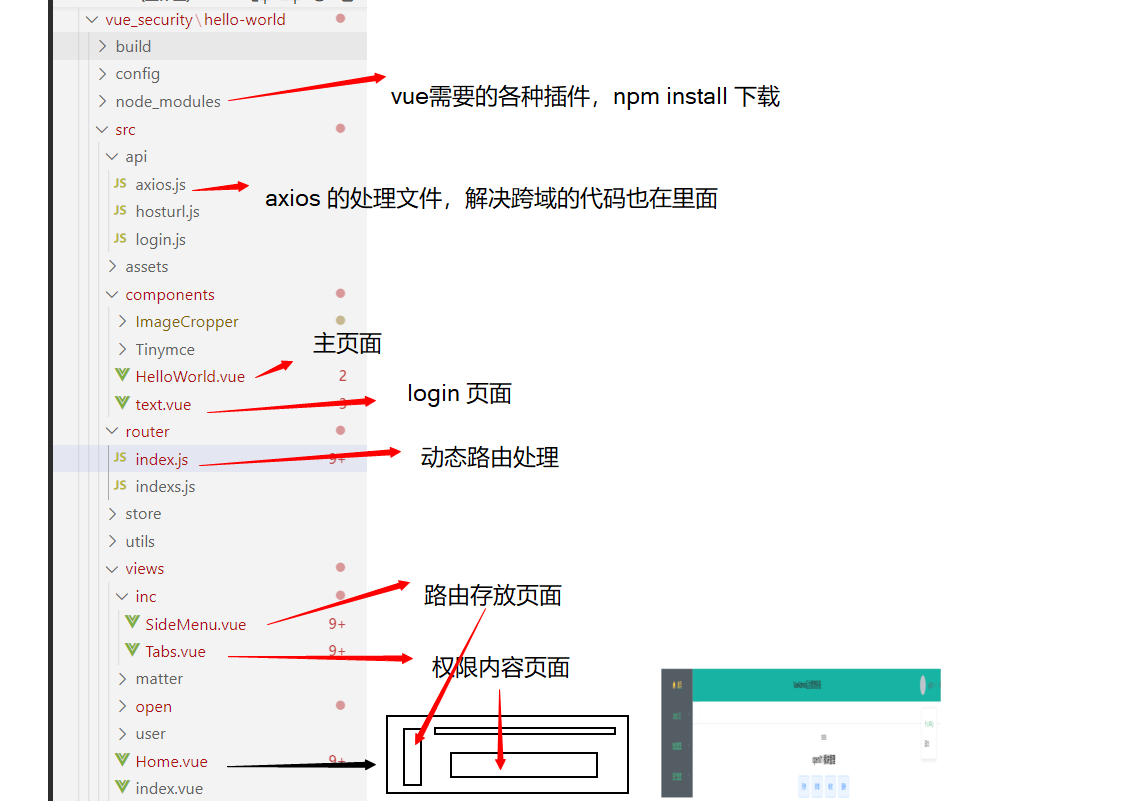
前台代码;代码逻辑比较复杂,在使用axios 登录方法之后配置一个axios .js 的自定义文件来对后台返回的Response (相应)进行处理,在去查询用户的权限,==(注意返回用户权限的格式需要按照VUE 路由的数据要求)==在把生成的路由格式条件到我们 指定的路由页面中()
生成路由结果
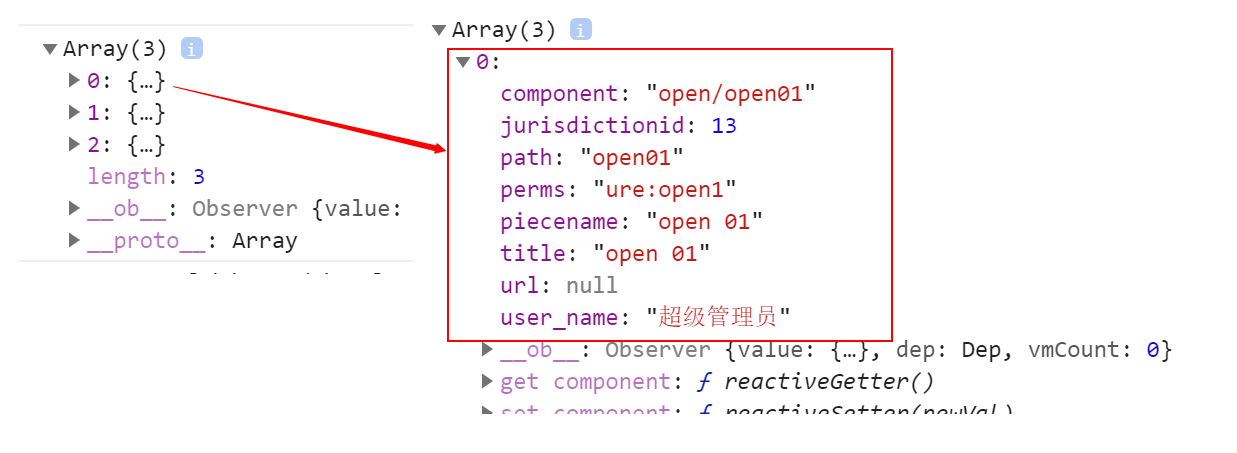
// 导航转成路由const menuToRoute = (menu) => {if (!menu.component) {return null}let route = {name: menu.perms,path: menu.path,meta: {icon: menu.icon,title: menu.title}}console.log(' AAAA = ' + menu.component)route.component = () => import('@/views/' + menu.component + '.vue')return route}
权限部分数据库字段解释
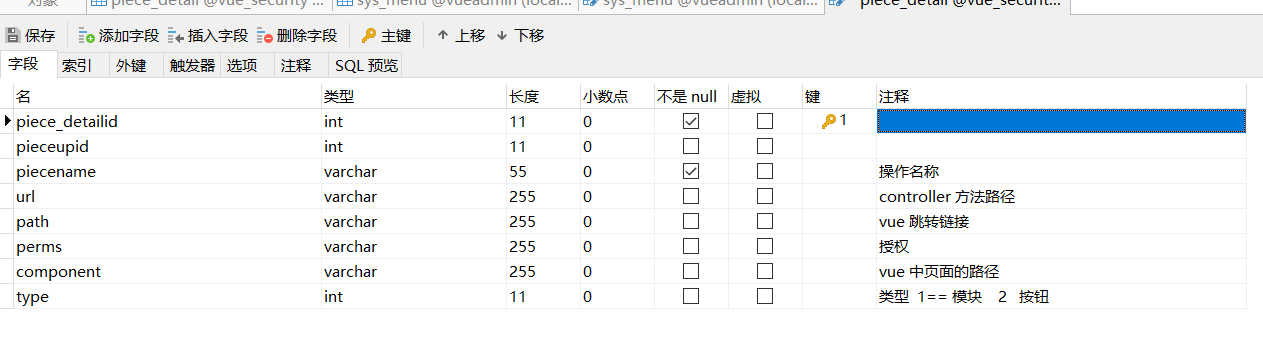
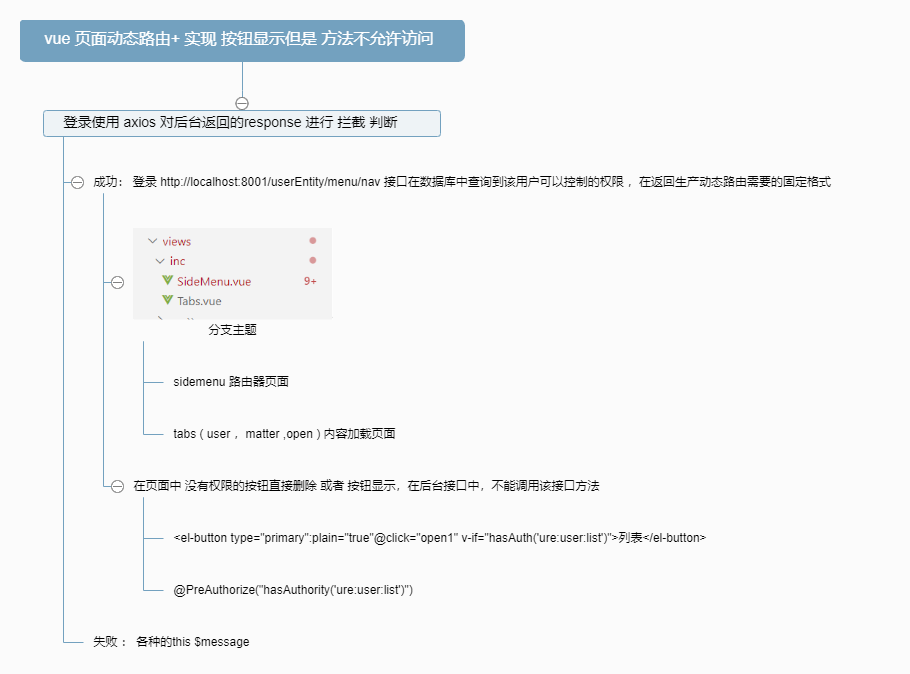
vue 前端代码这里就不介绍了,下图是权限使用的大致流程


")


")


还没有评论,来说两句吧...